Introduction
There are various unusual and amazing beasts and monsters generally through different legends and fables all around the planet. One of the most famous of these beasts is the strong griffin. It is conventionally acknowledged to have begun from Greek and Roman fables. After learn this blog visit our latest drawing tutorials like princess luna drawing step by Step.
This creature has the body of a lion while having the head, wings and paws of a beast bird. This infers that it looks genuinely cool, yet it can in like manner make it fascinating to sort out some way to draw a griffin. That is what this educational activity is staying nearby for, and around the completion of it you will see the manner in which tomfoolery and straightforward it will in general be! We need to accept that you value working with us on this step by step guide on the most capable technique to draw in a griffin 6 straightforward undertakings.
Stage 1 – Griffin Drawing
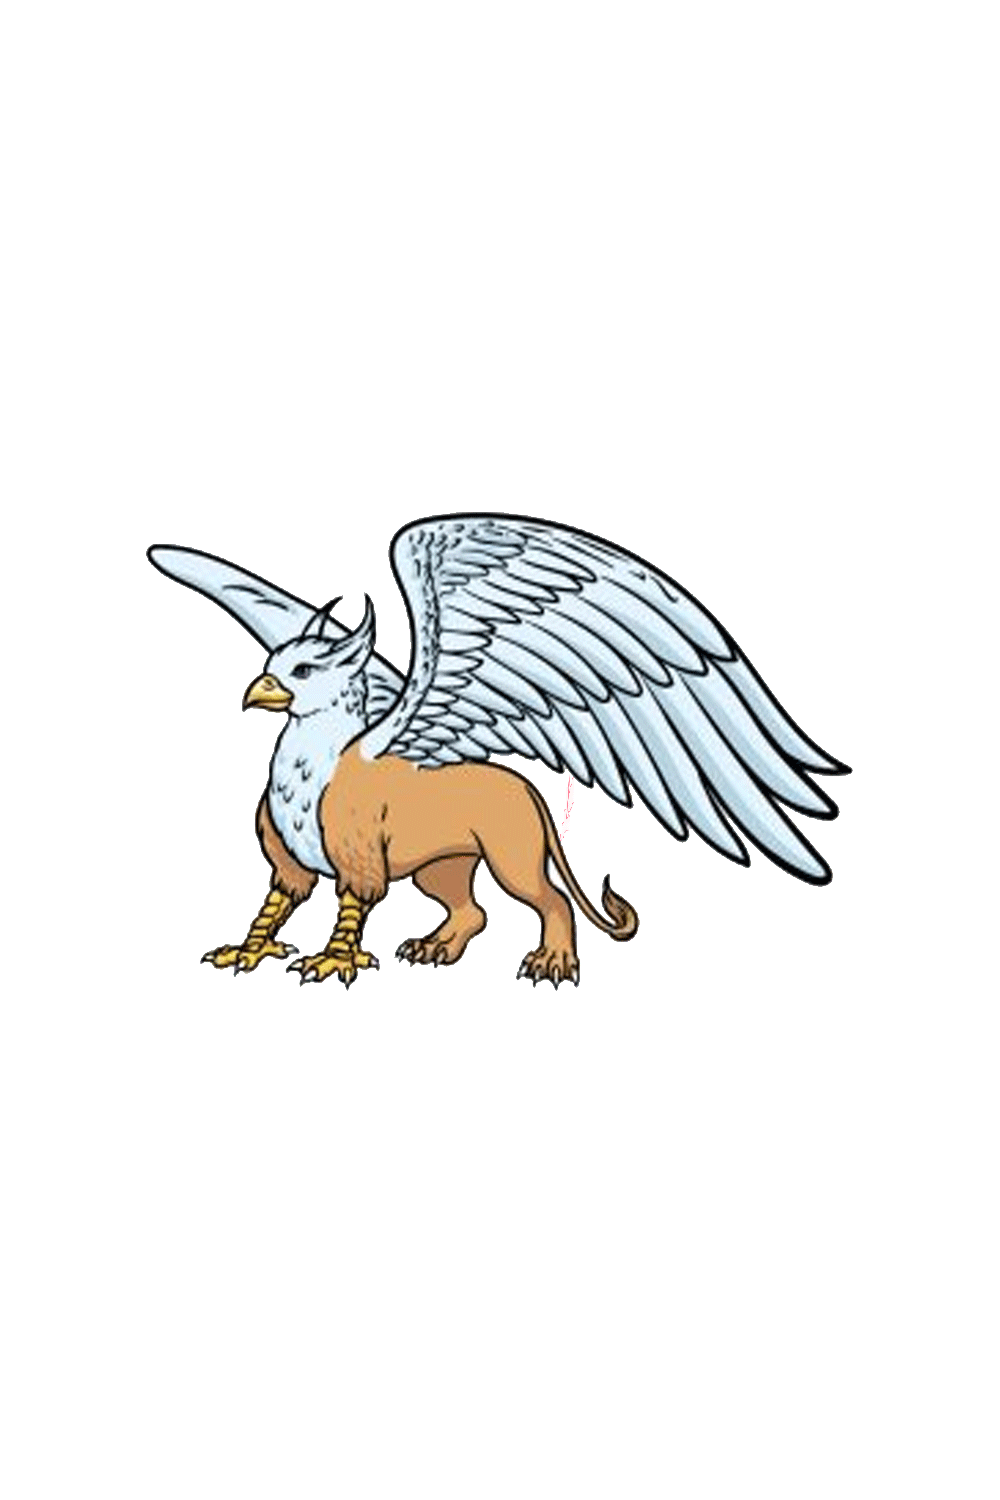
As we start this helper on the most capable strategy to draw a griffin, we will at first be drawing the head and bill of the beast. For the structure of the head and neck, we will use an unpleasant line. This will be to give the format a milder, more cushioned surface to it. We will moreover be using a couple of twisted lines ending up back at square one in a sharp tip to give the griffin a charming sharp mouth.
Finally, draw a couple of eyes onto the face, and a short time later we can finish this step by drawing two sharp crest poking off the most noteworthy mark of the head. When these have been drawn, we can progress forward toward the second step of the assistant.
Stage 2 – Draw the essential legs and add some crest nuances
For this next piece of your griffin drawing, we will add the front legs to the creature. As we referred to, these will generally be shaped like a lion’s legs. Yet the terminations will end up back at square one in a couple of sharp hooks. Use a couple of extra harsh lines to make the changed, soft most elevated marks of the legs as they appear in our reference picture.
Then, we will use stacks of little shapes partner with one another to make the wrinkly legs of the griffin, finally you can draw the tore at hooks around the end.
Stage 3 – Add a couple of wings for the griffin
Griffins are frequently portrayed with colossal and incredible wings. And that is what we will draw in this step of our helper on the most capable strategy to draw a griffin. For the present, we will fundamentally be drawing the fronts of the wings.
The main will connect up and in switch from the underpinning of the head, and as found in the reference picture it will have a fairly important size to it. Characterize another twisted limit for the wing outline on the contrary side, and subsequently you can finish by drawing another leg under. Add some tuft nuances to the chest, and subsequently we can keep on arranging 4!
Stage 4 – As of now draw another leg and a more prominent measure of the body
This piece of your griffin drawing will see you adding the last back leg for the creature. Use a couple of extra twisted lines to move the other back leg near the following one. This will moreover be related with the rest of the back of the griffin, and the tail will in like manner be spilling backward from it. There will regardless be a space between the wing and the back of the griffin, but we will fill that in soon!
Stage 5 – Draw a couple of nuances for the wings
Happening with this helper on the most capable technique to draw a griffin, we will right now add some more plume nuances for the wing of the griffin. To do this, characterize lots of insignificant twisted limits all over the edge of the front of the wings. As you draw nearer to the most noteworthy mark of the wing, these lines can get greater and longer to cause them to appear to be more prominent plumes. Now we will be ready to add a couple of last nuances in the accompanying phase of the helper!
Stage 6 – By and by, add the last wing nuances for this griffin
You’re basically ready to move to the last step of this griffin drawing, but first we have two or three parts to add. The essential thing that we will do is drawing different wings, and we will do this by using much more extended, twisted lines to make more crest. These plumes will be basically greater than any of the others that you have attracted as yet, and they will consume in the last space between the body and the wing. At the point when the graph is finished. So you could similarly add a couple of nuances and parts of your own!
Perhaps you could draw an establishment or add a couple of extra whimsical creatures to go with it for several considerations. What could you anytime consider to finish this image before the last step?
Stage 7 – Finish your griffin drawing with some tone
This is the last step of our helper on the most capable strategy to draw a griffin, and in it we will clean it off by adding a couple of tones. In our reference picture, we used a light, tan gritty hued tone for the lion pieces of the body. We then, at that point, involved some yellow for the bird bits of the legs and nose, and a short time later we finished by including light blues and grays for the plumes on the head and neck.
Your tutorial is Complete.
Also Read trending us news